You've now seen 2 posts of jewelry fun! The wedding has happened and was amazing! I am so happy for the lovely T & her D! Now that the festivities are over, I've got the last piece of the puzzle to share. All beautiful jewelry has to come in a beautiful package!
I had a super easy plan to acquire some mustard yellow boxes, tie them up with black ribbon and be done with it. Until Michael's thwarted this plan and lied about their stock of mustard yellow gift boxes. Suddenly, I had a project!
The raw materials, post the most depressing Michael's trip ever.
Cutting the felt was my first step. Mostly because it was the easiest and I was already tired. The felt will be placed inside the boxes. I didn't want to use black, as the necklaces were black and I couldn't find a matching yellow. This dark-ish gray ended up working amazingly well.
The next step was covering these ugly, naked boxes!!!!
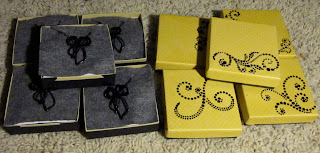
An Elmer's glue stick and some cardstock was all I needed to get these covered. All of the box bottoms were covered in black. (see above) All of the box bottoms were covered in mustard yellow with some cute, textured polka dots. (see below)
Ahhh!!! And then I ran into measuring issues. I could have fixed these, but I did not plan my time well enough to recut. :-(
Then came the BEDAZZLING!!! This was actually a super easy process. I got some scrapbooking gems. They were pre-shaped and on a sticker! Perfect! I just started cutting the sticker portion to make a unique shape for each box.
Here's a close up of the job of the felt. I cut diagonal lines to hold the chain behind and keep the pendant perfectly placed.
Halfway done!!!!
10 bridesmaid boxes in the bag! And each with it's own little twist. I was really proud with how these turned out. The color is a little off thanks to the lighting at 3am, but these are a darker mustard yellow and were a perfect match to the bride's colors.
Finally! The brides box! This was the hardest box. I first covered both the top and bottom in the same yellow cardstock. Then I covered the top in a translucent plastic paper with gorgeous, ornate, black designs. This paper was killer!!! The glue I had was not nearly strong enough to hold it tight, so I ended up pulling out the super glue to get the corners to agree with me.
Once I got all the paper to stick I put the finishing touches. I chose not to use the gray felt, since some of the boxes came with the cotton, so I stuck with that for the bride. I just wanted the tone of the opening of the box to be pure and clean. I think I pulled that off. *fingers crossed*
Close ups!!!!
Finished!!! 11 boxes total. 6.5 hours. And a bride who loved the end result.
I'm going to brag a bit and admit that I am super proud of this last minute DIY!
Oh! And a bonus shot of the adorable broken ring bearer who happens to belong to me!
(He likes to pose when he's all dressed up!)
Next up will be an update of my current crochet project! Stay tuned!
<3 A


